Using FSRM to Protect Against Ransomware
This blog post will show you how to use a freely available feature of Windows Server to increase your protection against ransomware attacks.
The solution here is not something that you rely on as being your ransomware protection, but, as its free and easy to setup, there is no reason why it can’t form part of a suite of measures you can introduce to protect your environment from both accidental and malicious threats.
Before we begin, I need to give credit to the following:
nexxai (JT Smith) · GitHub | Kittzus (Kittz) · GitHub | Anti-Ransomware File Server Resource Manager Filters (experiant.ca)
This is because the list that we use to keep the block list up to date is provided free of charge (you can donate) by these awesome people who are doing a great thing for the good of the IT community.
So, how is it done…
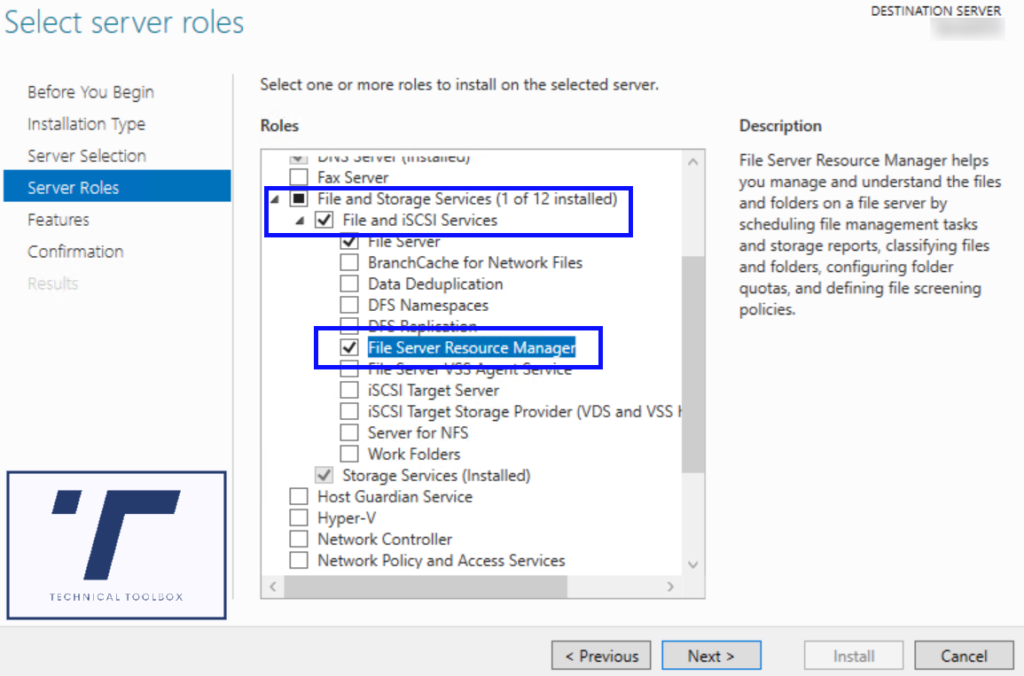
- On a Windows Server 2012 or above, install the Role File Server Resource Manager, a restart of the server is not required when you install this role.

2. After the role has installed, open Server Manager, open File Server Resource Manager – FSRM
3. Right click File Server Resource Manager (Local)
4. Configure Options…

5. Enter the SMTP server
6. Enter the email address to send to and from
7. Send Test Email to make sure it works

8. On the Notification Limits tab change email notification to 5 minutes

9. Click OK
10. Open up an administrative Powershell session on the server
11. Run the following Powershell command to create a new filegroup with an up to date list of known ransomware file extensions gathered from https://fsrm.experiant.ca using their free API
# Create new File Group called Anti-Ransomware and include list of files from experiant.ca
New-FSRMFileGroup -name "Anti-Ransomware" -IncludePattern @((Invoke-WebRequest -Uri "<a href="https://fsrm.experiant.ca/api/v1/get">https://fsrm.experiant.ca/api/v1/get</a>").content | convertfrom-json | % {$_.filters})

# Export the list of file extensions in the file group to a CSV on the C drive. This is optional but can help with helpdesk calls.
(Get-FSRMFileGroup -Name "Anti-Ransomware").IncludePattern | Out-File C:\Anti-Ransomware-List.csv
12. In FSRM, expand File Screening Management, click File Groups and make sure you can now see the Anti-Ransomware File Group. You may need to refresh the window
13. Right click File Screen on the left pane and select Create File Screen

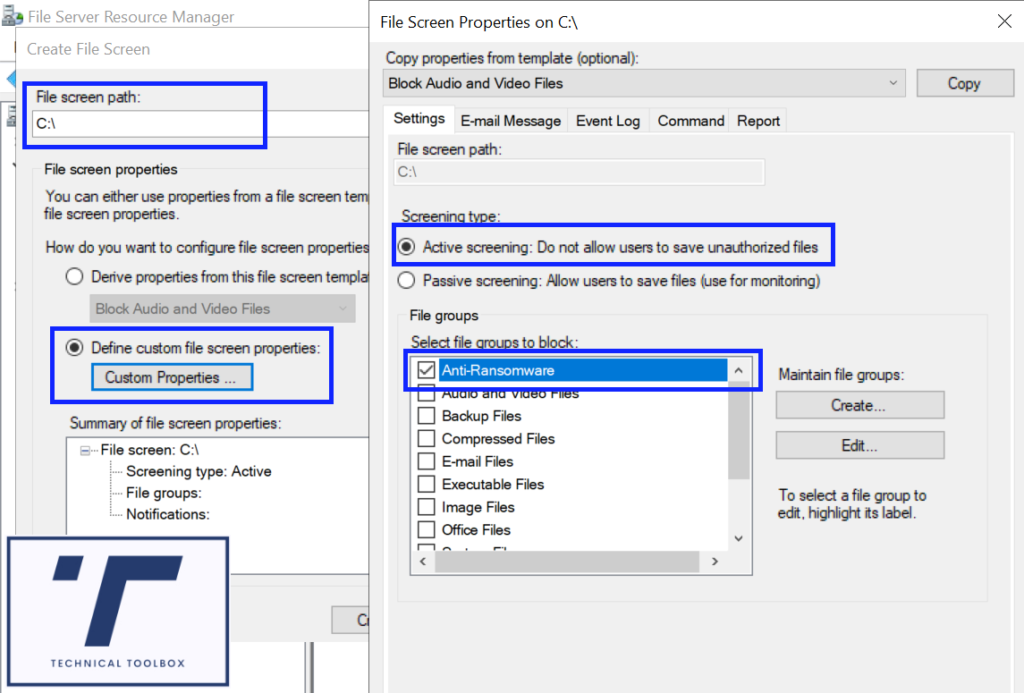
14. Click browse and choose the drive/share/path you want to protect
15. Click Define custom file screen properties
16. Click Custom Properties
17. Under Settings, make sure Active screening is checked and select the Anti-Ransomware File Groups in the box underneath

18. On the E-mail Message tab tick the Send e-mail to the following administrators box. You do not need to modify this page if you successfully completed the email setup, however, you can change this to target specific individuals or shared mailboxes
19. Modify the Subject and Message Body as desired for your organisation. This is what the administrators are going to receive as an alert so make sure you include enough detail. Here is a suggestion:
Suggested Email subject line: ***URGENT*** [Server] – Unauthorized file from the [Violated File Group] file group detected
Suggested Email body: User [Source Io Owner] attempted to save [Source File Path] to [File Screen Path] on the [Server] server. This file is in the [Violated File Group] file group. This action requires URGENT investigation
Items in square braces [ ] are variables.
20. On the Event Log tab, check the box to send to event log – this is important in the event of a successful attack to establish the source
21. Click OK
22. Click Create
23. Click Save the custom file screen without creating a template
24. Click OK
25. Repeat from step 11 for all shares and drives that you want to protect
Update the file list
It’s important to keep this list up to date, if you don’t then over time you decrease the effectiveness of the solution. I set a reminder in my calendar to update the servers once a month.
To keep this list up to date, simply run the following PowerShell command, regularly on the server
# First, remove the current Anti-Ransomware file group
Remove-FSRMFileGroup -Name "Anti-Ransomware"

# Recreate the Anti-Ransomware file group with the latest list of file extensions
New-FSRMFileGroup -name "Anti-Ransomware" -IncludePattern @((Invoke-WebRequest -Uri "<a href="https://fsrm.experiant.ca/api/v1/get">https://fsrm.experiant.ca/api/v1/get</a>").content | convertfrom-json | % {$_.filters})

# Remove the CSV stored on the C Drive
Remove-Item C:\Anti-Ransomware-List.csv

# Recreate the CSV with the updated file extension list
(Get-FSRMFilegroup -Name "Anti-Ransomware").IncludePattern | Out-File C:\Anti-Ransomware-List.csv
Now, check that your File Screen is still configured to use the Anti-Ransomware file group, if not, simply add it back on.
I have chosen not to automate this any further, such as using a scheduled task, that is because we can keep on top of the changes that are happening if we update it manually (and its not a long task to update it).